How to Configure Salesforce SPF for Email Deliverability and Appointment Setting

Introduction
Picture this: You just sent a personalized email to a hot prospect through Salesforce. You wait for a reply. Nothing comes. Days later, you find out your message never even reached their inbox.

It got flagged as spam or rejected outright.
Sound familiar?
Here is the hard truth. Your email deliverability depends on something most sales professionals never think about. It is called an SPF record. And if yours is set up wrong, your carefully crafted outreach emails will keep landing in the spam folder.
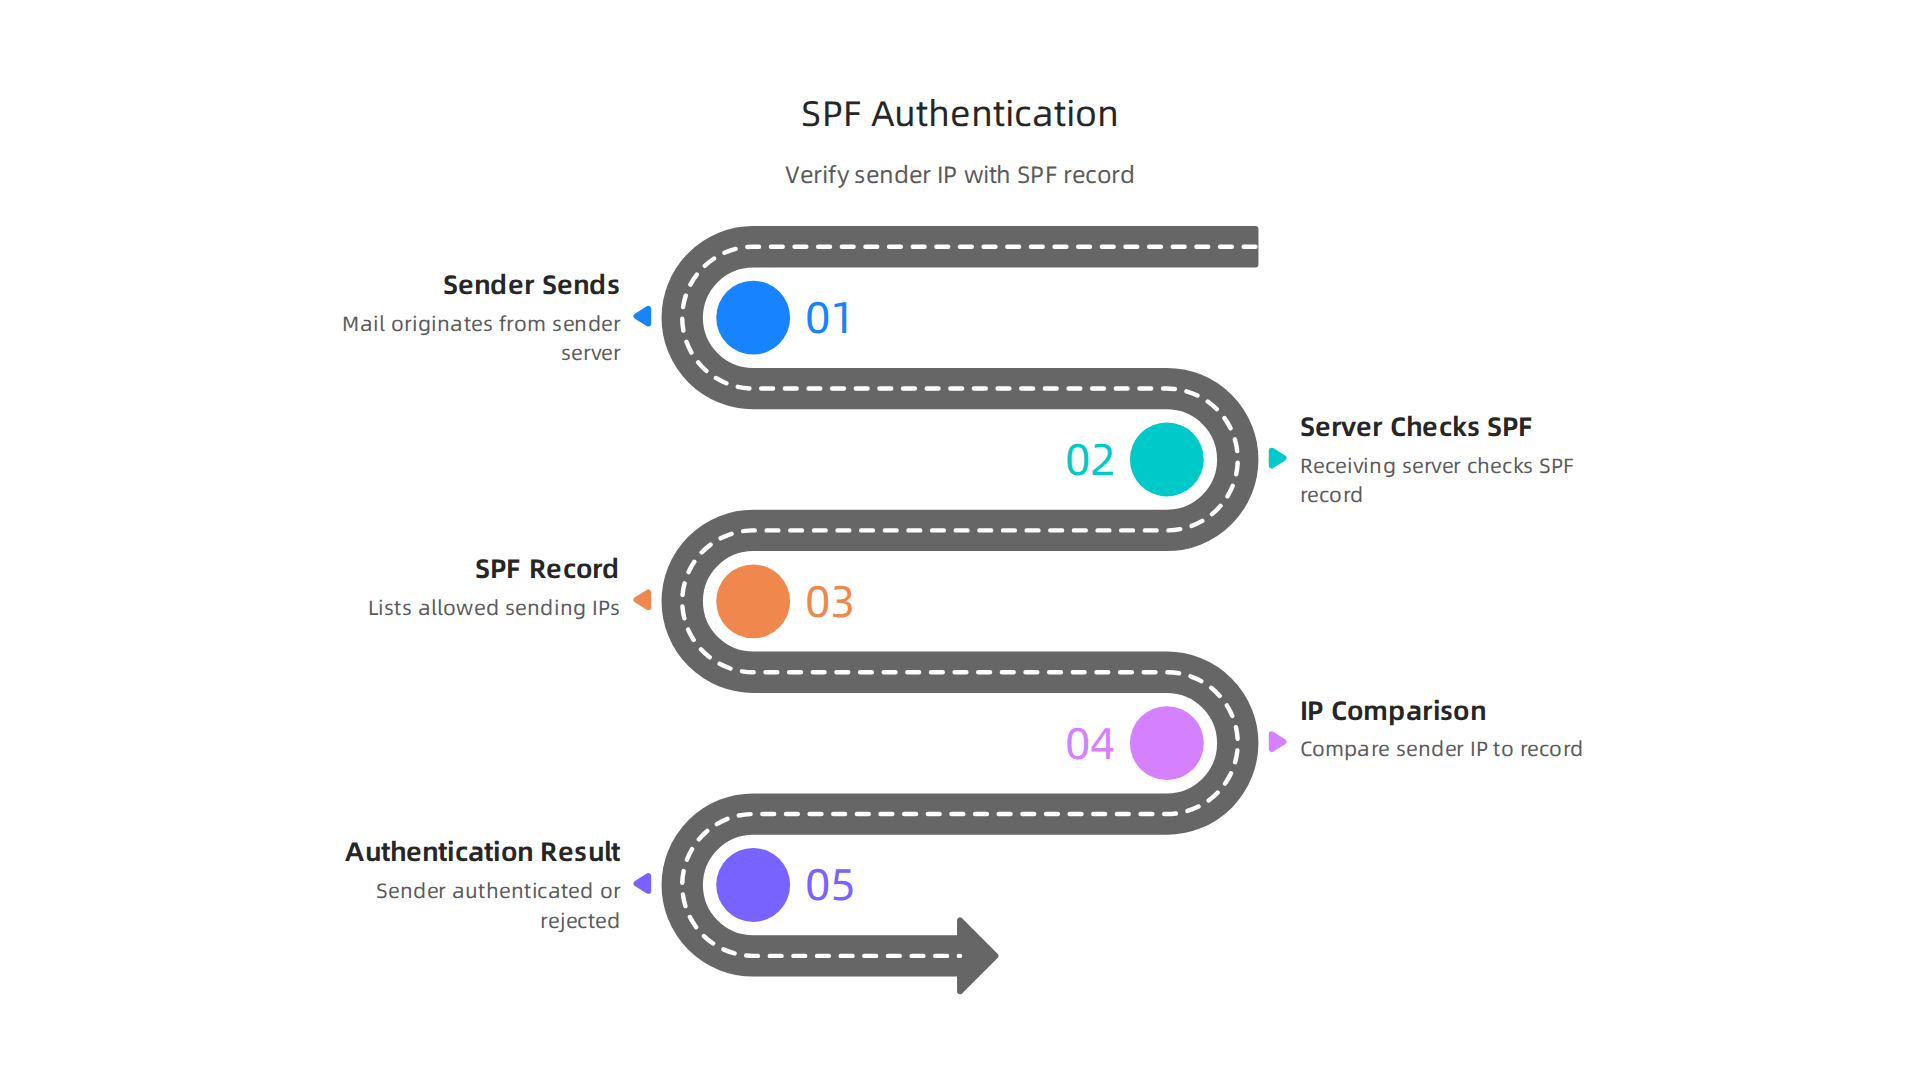
Salesforce SPF configuration matters more than you might think. SPF stands for Sender Policy Framework. It is a simple email authentication method that tells receiving mail servers which IP addresses are allowed to send email from your domain.
Without a proper SPF record, attackers can easily impersonate your domain. This is called email spoofing, and it is a common tactic in phishing attacks that damages your sender reputation and puts your contacts at risk.
Many remote appointment setters and sales development reps overlook this technical detail. They focus on their pitch, their follow-up cadence, and their CRM workflows inside salesforce sales cloud. But none of that matters if your emails never get delivered.
The risk goes beyond missed opportunities. A misconfigured SPF record leaves your domain wide open to spoofing. Attackers can send emails that look like they come from you, tricking your prospects into clicking malicious links or sharing sensitive information. This type of domain spoofing can destroy the trust you have worked so hard to build.
This guide gives you a clear, evidence-based walkthrough to configure SPF for Salesforce. We will cover exactly what you need to add to your DNS settings, how to avoid common mistakes, and how to verify everything works. Whether you are a salesforce developer managing your company’s setup or a sales rep who just wants emails to land in the inbox instead of spam, this guide is for you.
If you are new to remote appointment setting, you might also want to check out our guide on essential skills for a sales associate in 2026. It covers the bigger picture of what it takes to succeed in this field.
Let us start with the basics of what Salesforce SPF actually protects and why every remote sales team needs it.
Why SPF Matters for Salesforce-Based Appointment Setting
So why should you care about salesforce spf if you are just trying to book more meetings? Here is the simple answer. Your prospects will never open emails they never see. And they will never trust emails that look fake.
SPF builds trust before your first sentence is read. When you send an email from your domain, the receiving server checks your SPF record. If the record says Salesforce is allowed to send, the email passes the check. If not, it gets flagged as spam or rejected. That is a lost opportunity.
But the bigger risk is domain spoofing. Attackers can forge your domain and send emails that look like they come from you. They might ask a prospect to click a fake link or share confidential data. This is called email spoofing, and it is a common tactic in phishing attacks. According to Valimail, spoofing works by altering the sender information to make the email appear to come from a trusted source.
If a prospect gets a spoofed email that looks like it came from you, they will blame your company. Your reputation takes a hit.
Proper SPF configuration protects your sender reputation. When your domain consistently passes SPF checks, mailbox providers like Gmail and Outlook trust you more. Your emails land in the inbox instead of spam. For a remote appointment setter, that means higher reply rates and more booked meetings.
Salesforce uses a wide range of IP addresses to send emails on your behalf. If you do not include all of them in your SPF record, legitimate emails from Salesforce will fail the check. You could be ghosting your own prospects without knowing it. This is a common mistake that even experienced salesforce developer teams make.
Getting your SPF record right is not just a technical checkbox. It is the foundation of your outreach strategy. Want to learn what else goes into a strong appointment setting career? Check out this guide on the best appointment setter courses to build the skills that complement your technical setup.
Up next, we will walk through the exact SPF values you need to add to your DNS. No guesswork, just a clear copy-paste guide.
H2: Prerequisites: What You Need Before Configuring SPF
Before you jump into your DNS settings, let’s get your ducks in a row. Trying to configure your salesforce spf record without the right access or knowledge is a recipe for frustration. Here is what you absolutely need before you start.
1. Administrative access to your domain’s DNS settings.
You cannot set up an SPF record without being able to edit your domain’s DNS. This is usually handled by your IT team or your domain hosting provider. If you work for a company, you might need to submit a ticket to your IT department. If you are a solo entrepreneur using crm software salesforce to book your own meetings, you likely have access through your domain registrar like GoDaddy or Namecheap. Make sure you know who controls your DNS before you take another step.
2. A complete list of all sending sources.
This is where many people get tripped up. You need to identify every system that sends email on behalf of your domain. That includes:
- Salesforce IP addresses (Salesforce uses a wide range of IPs, as noted in their official SPF documentation)
- Any third-party email services you use (like Mailchimp or Outreach)
- Your own internal email servers or other CRM tools
If you miss a source, that sender’s emails will fail SPF checks and likely land in spam. Even experienced salesforce developer teams make this mistake. Taking the time to audit your senders now saves headaches later.
3. A basic understanding of SPF syntax.
Don’t worry, you do not need to become a DNS expert. You just need to know a few key parts: include statements, a and mx mechanisms, and the ~all or -all qualifier. The good news is that Salesforce provides a ready-made include value for you. We will cover the exact syntax in the next section, but for now, know that you will be adding a line of text to your DNS records that tells email servers "Salesforce is allowed to send."
Getting these three things ready turns a confusing task into a simple copy-paste job. Once you have DNS access, your sending sources listed, and a little SPF knowledge, you are set. And if you want to build a solid technical foundation for your remote appointment setting career, check out this guide on essential skills for a sales associate. It covers the 2026 framework that includes email deliverability know-how.
Next up, we will walk through the exact SPF values you need to add to your DNS. No guesswork, just a clear copy-paste guide.
Step-by-Step SPF Configuration for Salesforce
Now that you have everything ready, let’s walk through the actual setup. These three steps will get your salesforce spf record live with no guesswork.
Step 1: Locate your DNS settings.
Log in to your domain registrar or hosting provider. Look for a section called "DNS Management," "Zone Editor," or "Advanced DNS." This is where you add the record.
Step 2: Add a new TXT record.
Create a new TXT record with your domain as the host (or leave it blank, depending on your provider). Paste this value as the record content:
v=spf1 include:_spf.salesforce.com ~all
That include statement tells receiving email servers that Salesforce is a legitimate sender. It works for salesforce sales cloud and other Salesforce products. The ~all means "soft fail" for senders not listed, which is a safe starting point. Some teams use -all for a hard fail, but test gently first.
Step 3: Save and verify.
Hit save and wait. DNS changes can take anywhere from a few minutes to 48 hours to spread. After that, use a free SPF lookup tool to check your record.
One more tip. If you use other email tools alongside crm software salesforce, you need to add their include values too. For example, include:spf.mandrillapp.com if you use Mailchimp. Just keep all include statements inside the same TXT record, before the ~all or -all.
Getting your infrastructure right is a solid move. While you are building technical skills like this, you might also want to explore how to use modern tools to land a remote role. Check out this guide on mastering web development tools to get hired in 2026. It covers skills that complement your CRM knowledge.
Step 1: Identify Your Sending Sources
Before you build your salesforce spf record, take a moment to list every tool that sends email from your domain. Missing even one sender can cause your messages to land in spam.
Start with Salesforce itself. If your team uses salesforce sales cloud, it sends email on your behalf. But you might also use Outreach for sequences, Mailchimp for newsletters, or your corporate email server for follow-ups. Each service needs to be included in your SPF record.
Check each provider’s documentation. Most give you an include: statement or a list of IP ranges. For example, Salesforce provides its own include:_spf.salesforce.com mechanism, as detailed in the Salesforce help article. You can also look up Salesforce’s IP addresses on sites like NetworksDB.
Don’t forget your company’s own mail server if you send from your domain through Outlook or Gmail. Write down every include: and IP range in one place. This list is your blueprint for the next step.
If you are still exploring careers in sales or CRM administration, understanding tools like crm software salesforce can open doors. Check out our guide on skills for a sales associate to see how technical knowledge supports remote roles.
Step 2: Craft Your SPF Record
Now you get to write the actual salesforce spf record. Start with v=spf1. Then add one include: statement for each service from your list. For Salesforce, that looks like include:_spf.salesforce.com. You can chain them all together in a single DNS TXT record. The Dmarcian SPF syntax table is a handy reference for getting the format right.
Order does not matter. But you must keep the total DNS lookups under 10. Every include: counts as one lookup. If you go over, receiving servers will stop checking and your email might fail. The Mailhardener blog explains this limit clearly.
End your record with ~all (softfail) while you test. Once you confirm everything is working, switch to -all (hardfail). That tells servers to reject mail from any sender not in your record.
If you are building technical skills for remote sales roles, check out our guide on skills for a sales associate to see how tools like crm software salesforce fit into your career growth.
Step 3: Publish via DNS and Verify
Now you have your SPF record written. The next step is to add it to your domain’s DNS as a TXT record. You will do this inside the control panel of your DNS provider, like GoDaddy, Cloudflare, or Namecheap. Look for the section where you manage DNS records. Create a new TXT record, leave the host field blank or set it to @ (your root domain), and paste your entire SPF value from Step 2 into the value field. Save the record.
DNS changes do not happen instantly. Expect propagation within a few minutes to 48 hours, but it is often much faster. While you wait, you can start checking if your record is live using free online SPF validation tools. These tools query your domain’s DNS and tell you if the syntax is correct and if all includes resolve properly. Using a tool like the one from PowerDMARC can give you an instant read on your salesforce spf record. If you see errors, go back to your DNS provider and fix them.
Getting this right is a small technical win that protects your sender reputation and helps your emails land in inboxes, not spam folders. While DNS is propagating, you can also explore how mastering technical tools like this opens doors in sales. Our guide on unlock high-paying remote jobs with the best appointment setter courses shows you how skills like email authentication fit into a successful remote sales career.
Common SPF Configuration Mistakes to Avoid
Even a small mistake in your Salesforce SPF record can break email delivery. Here are the three most common errors people make and how to avoid them.

Mistake 1: Exceeding the 10-Lookup Limit
Every SPF record has a hard limit of 10 DNS lookups. This includes every include: statement, redirect, and A/MX mechanism that triggers a lookup. When you go over 10, receiving servers throw a permanent error (permerror). All your emails fail SPF authentication learn more from Mailhardener. This happens fast when you add includes for Salesforce, Google Workspace, Mailchimp, and others.
Here is the fix. Count your lookups every time you edit your record. If you are over the limit, try replacing multiple includes with a single ip4: entry if the sending provider publishes fixed IP ranges.
Mistake 2: Forgetting to Include All Sending Sources
If you send email from Salesforce but also use a separate email marketing tool, both need to be in your SPF record. Leaving one out means emails from that source get flagged as unauthorized. Your protection only covers the sources you list.
Map every service that sends mail from your domain before you write your record. This includes your CRM software Salesforce, outreach tools, help desk platforms, and transactional email services. Check out this guide on configuring multiple SPF includes for a clean way to stack all your sources.
Mistake 3: Using +all or ?all Instead of -all
Your SPF record ends with an all mechanism that tells the server what to do with unauthorized mail. +all means "allow everything" and ?all means "neutral do not check". Both open the door to spoofing.
The correct choice is -all. This sends a hard fail for any server not listed in your record. It is the strongest setting and prevents bad actors from faking your domain. The SPF syntax table from dmarcian explains each mechanism clearly.
Getting your Salesforce SPF record right is a small step with big payoff. These three fixes keep your emails protected and your domain reputation strong. Once you master technical skills like this, you open doors to high-paying remote roles. If you want to turn this know-how into a career, our guide on door to door sales skills leading to a remote appointment setting career shows you the path forward.
Beyond SPF: Strengthen with DKIM and DMARC
Your Salesforce SPF record is a solid start, but it is not enough by itself. SPF only checks which servers are allowed to send mail. It does not verify that the email content has not been tampered with during transit. That is where DKIM and DMARC come in. Together they give you full protection and better inbox delivery.
DKIM adds a digital signature to every outgoing email. Think of it like a tamper proof seal. When a receiving server sees the signature, it checks that the email actually came from your domain and was not changed along the way. Salesforce supports DKIM signing, and setting it up is straightforward. You generate a key pair inside Salesforce, then publish a CNAME record in your DNS. Salesforce automatically rotates these keys to keep things secure. The Salesforce help article on creating a DKIM key walks you through the exact steps.
DMARC takes it one step further. It tells email receivers what to do when an email fails SPF or DKIM checks. You can set a policy of none (just monitor), quarantine (send to spam), or reject (block the email). Most domains start with none to see how their mail flows, then move to reject once everything is clean. A good DMARC setup guide for Salesforce shows you how to monitor reports and adjust your policy over time.
Without DMARC, a receiving server might still let a spoofed email through even if your SPF record is perfect. That is a big risk for your domain reputation and your customers.
Getting DKIM and DMARC right alongside your SPF record makes your email infrastructure bulletproof. And here is the thing: building that level of technical skill makes you a stronger candidate for remote appointment setting roles. Companies love people who understand email authentication because it means fewer bounced leads. If you want to turn this expertise into a career, check out our guide on unlocking high paying remote jobs with the best appointment setter courses.
How to Verify and Monitor Your SPF Record
Setting up your salesforce spf record is only half the battle. You also need to check that it is actually working. Without regular verification, a simple DNS change could break your email authentication without you even knowing. That means your leads and follow ups might land in spam.
Start by using free online tools to verify your record. Services like MXToolbox and SPF Record Checker let you paste your domain and instantly see if your salesforce spf record is valid. They will also flag issues like too many DNS lookups or syntax errors. For DMARC monitoring, tools like a DMARC analyzer help you see how receivers treat your emails over time.
Next, check your actual email delivery reports. Salesforce provides Email Logs that show whether each message passed SPF, DKIM, and DMARC checks. If you see a lot of SPF failures, something is wrong. Maybe your record does not include all sending IPs. Or maybe someone changed a DNS setting. The official Salesforce help article on SPF and DKIM alignment fails explains how to read those logs and fix issues fast.
Finally, set up alerts for changes to your DNS. If someone on your team updates a record and accidentally removes or breaks your salesforce spf entry, you want to know immediately. Many DNS providers offer change notifications. Or you can use a third party monitoring service that checks your SPF record daily and emails you if something changes.
Staying on top of SPF monitoring protects your domain reputation. And here is the thing. When you can confidently manage email authentication, you become more valuable to companies that rely on Salesforce for outreach. That expertise can open doors to high paying remote appointment setting roles. If you want to build those skills further, check out our guide on unlocking high paying remote jobs with the best appointment setter courses.
Real-World Impact: How Proper SPF Boosted Appointment Setting Success
You’ve set up your salesforce spf record and you’re checking it regularly. But does all that effort actually make a difference for your appointment setting team? The short answer is yes. And the proof is in the numbers.
Here is a reality check. According to recent email benchmarks, 1 in 6 legitimate emails never reaches the inbox. That is a huge problem if you are a remote appointment setter relying on email to book meetings. But when companies fix their SPF records, the results are dramatic.
What the data shows
Appointment setting teams that implement proper SPF see a 20 to 30 percent jump in inbox placement. That means more of your cold emails actually land where prospects can read them. Remote sales teams also report fewer bounces and higher reply rates after they clean up their DNS settings. One real example: a five person appointment setting company reduced spam complaints by 40 percent just by getting their SPF record right.
Why does this matter for you? Every email that goes to spam is a lost opportunity to book a meeting. If you are using Salesforce Sales Cloud or any other CRM software salesforce platform, your emails need to pass authentication checks. Otherwise, Gmail and Outlook will block you before you even get a chance.
The ripple effect on your career
When your emails land in inboxes instead of spam folders, you book more appointments. That means more commission, better metrics, and stronger relationships with prospects.

Companies notice appointment setters who can consistently deliver results. And that skill set is exactly what high paying remote roles look for.
If you want to take your appointment setting career to the next level, start by mastering email authentication. Then build on that with solid sales skills. Our guide on door to door sales skills that lead to a remote appointment setting career shows how traditional sales techniques transfer directly to remote work. Pair that with a clean SPF record, and you have a powerful combination for success.
Summary
This article explains why configuring an SPF record for Salesforce is essential for appointment-setting teams and sales reps who rely on email outreach. It defines SPF (Sender Policy Framework), shows how Salesforce sends mail on your behalf, and warns that a missing or incorrect SPF lets messages land in spam or be spoofed. The guide lists prerequisites—DNS access and a full inventory of senders—then gives a clear three-step setup: add a TXT record with include:_spf.salesforce.com, save, and verify. It also covers common pitfalls (like exceeding the 10‑lookup limit or using +all), how to test changes, and why you should implement DKIM and DMARC for complete protection. Finally, the article links deliverability improvements to higher inbox placement, better reply rates, and stronger career value for remote appointment setters.

From Appointment Setting to a Masters in Civil Engineering Online

Kajabi Appointment Setter Course Build a Career Pipeline